The best Guide to Cooking Delicious Chicken on Blackstone Griddle
Table of Contents
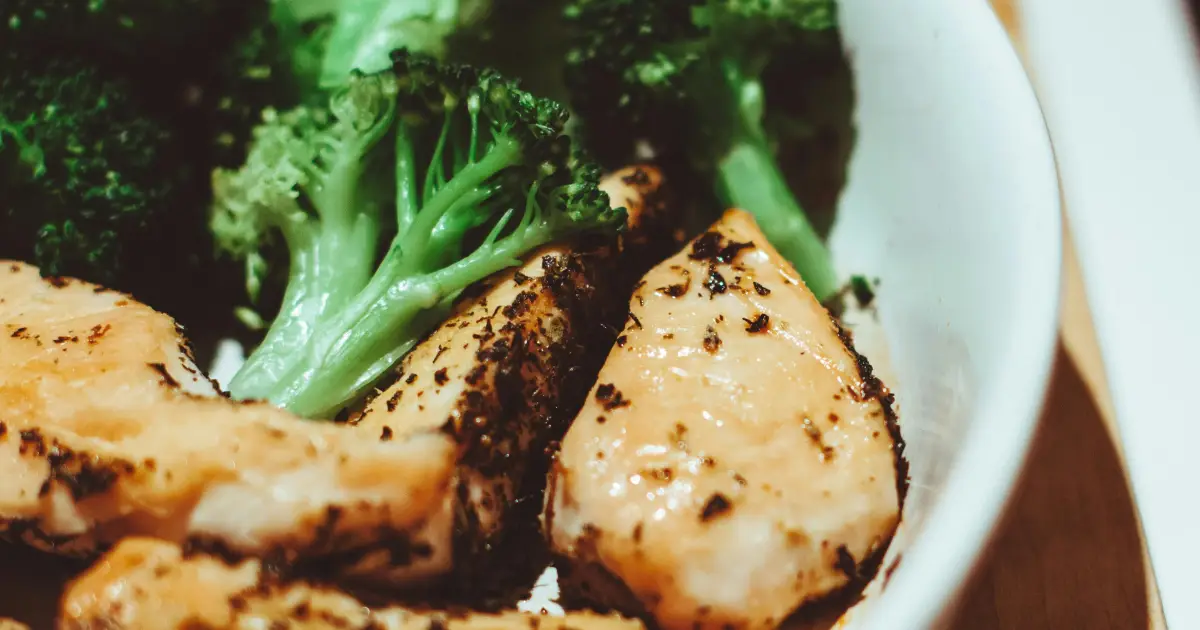
The Sizzling Journey Begins of chicken on blackstone
Remember that first time you bit into a perfectly cooked piece of chicken? That golden-brown exterior giving way to tender, juicy meat within? That’s the moment I fell in love with cooking chicken on my Blackstone griddle.
Before discovering this culinary game-changer, my chicken dishes often fell short – either too dry or lacking that restaurant-quality sear. Everything changed when a neighbor invited me over for a backyard cookout where he was preparing chicken on his Blackstone. The moment those sizzling pieces hit my plate, I knew my cooking approach would never be the same.
Blackstone griddles have revolutionized outdoor cooking by providing the perfect cooking surface for chicken – flat, evenly heated, and with enough space to cook for a crowd. The versatility alone makes these griddles worth the investment, but it’s the results that will truly convert you.
By the time you finish reading this guide, you’ll have all the knowledge needed to transform raw chicken into mouthwatering meals that will have family and friends convinced you’ve secretly enrolled in culinary school.
Why Your Blackstone Griddle is Perfect for Cooking Chicken
The Blackstone advantage begins with its design. Unlike traditional grills with their uneven heating and flare-up issues, your Blackstone provides a consistently heated flat cooking surface that makes contact with every inch of your chicken. This creates that coveted restaurant-quality sear while simultaneously locking in precious moisture.
Temperature control stands as perhaps the greatest benefit when preparing chicken. Anyone who’s cooked poultry knows the narrow margin between undercooked (dangerous) and overcooked (dry and disappointing). Your Blackstone allows precise heat management across different zones, letting you sear at high temperatures before moving chicken to medium heat to finish cooking thoroughly.
The spacious cooking surface also eliminates crowding – a common mistake that leads to steaming rather than searing. With ample room, each piece develops that beautiful golden crust that seals in flavor and juices.
Whether you’re cooking boneless breasts, succulent thighs, or even a whole spatchcocked chicken, the Blackstone handles it all with remarkable efficiency and consistently superior results.
Essential Equipment for Blackstone Chicken Success
Griddle Tools You’ll Need
Equipping yourself with the right tools makes all the difference when cooking chicken on your Blackstone. Long-handled spatulas and tongs keep your hands safely away from the hot surface while providing precise control over your chicken. Look for stainless steel options with comfortable grips – the Blackstone brand offers excellent choices, though any quality restaurant-grade tools will serve you well.
A reliable meat thermometer isn’t optional – it’s essential. Digital instant-read versions provide quick temperature checks to ensure your chicken reaches the safe internal temperature of 165°F without overcooking.
Consider investing in squeeze bottles for oils and dedicated shakers for your favorite seasonings. These allow precise application without making a mess. Heat-resistant gloves provide additional protection for those moments when you need to adjust food or equipment near the hot surface.
Blackstone Griddle Preparation
Proper preparation begins with seasoning your griddle surface. This creates a natural non-stick layer that’s particularly important for chicken, which tends to stick more than fattier meats.
Before cooking chicken, always preheat your Blackstone for at least 10-15 minutes. This ensures the surface reaches the ideal temperature and eliminates cold spots. An infrared thermometer can help confirm your griddle has reached the optimal 375-400°F range for chicken.
Create distinct cooking zones by adjusting your burners to different settings. Set one side to high heat (for initial searing) and another to medium (for thorough cooking without burning). This two-zone approach gives you complete control throughout the cooking process.
Choosing the Right Chicken for Your Blackstone
Best Cuts for Blackstone Cooking
While virtually any chicken cut shines on a Blackstone, some particularly excel on this cooking surface.
Boneless chicken breasts, though notorious for drying out, transform on the Blackstone. Their flat profile makes perfect contact with the griddle surface, creating an even sear while the precise temperature control helps maintain moisture. Expect 5-7 minutes per side depending on thickness.
Bone-in chicken thighs offer more forgiveness thanks to their higher fat content. The Blackstone renders this fat beautifully, creating crispy skin while keeping the meat incredibly juicy. Allow 7-9 minutes per side, starting with the skin side down.
For showstopping presentations, try a whole butterflied (spatchcocked) chicken. By removing the backbone and flattening the bird, you create even thickness that cooks uniformly on the griddle. Use a heavy cast iron press to ensure complete contact with the cooking surface.
Chicken tenders provide a quick-cooking option perfect for weeknight meals, taking just 3-4 minutes per side while still developing excellent caramelization.
Preparation Before Hitting the Griddle
Proper preparation dramatically improves your chicken’s flavor and texture before it even touches the griddle.
Consider brining – soaking your chicken in a solution of salt, water, and sometimes sugar or aromatics for several hours before cooking. This simple step increases moisture retention by up to 15%, resulting in noticeably juicier chicken after cooking.
Marinades infuse flavor while tenderizing the meat. Oil-based marinades with acid (like lemon juice or vinegar) work particularly well for Blackstone cooking. Allow at least 2 hours for the flavors to penetrate, though overnight delivers the best results.
Dry rubs create that spectacular crust that Blackstone cooking excels at developing. Apply generously to slightly moistened chicken about 30 minutes before cooking to allow the flavors to begin absorbing.
Always bring chicken to room temperature safely before cooking (no more than 30 minutes on the counter). This ensures more even cooking and better browning.
Step-by-Step Guide to Cooking Chicken on Blackstone
Perfect Chicken Breast on Blackstone
- Start with brined or marinated chicken breasts of even thickness (pound thicker parts if necessary).
- Apply a light coating of high-smoke-point oil like avocado or grapeseed to the breast and the heated griddle surface (375-400°F).
- Place breasts presentation-side down first and allow to cook undisturbed for 5-6 minutes until golden brown.
- Flip once and cook an additional 5-7 minutes, moving to a slightly cooler zone if browning too quickly.
- Check temperature in the thickest part – remove at 160°F as temperature will rise during resting.
- Rest for 5 minutes minimum under loose foil to allow juices to redistribute throughout the meat.
Juicy Chicken Thighs Blackstone Method
- Start with dry, room temperature thighs, skin thoroughly patted dry for maximum crispiness.
- Season skin generously with salt and preferred seasonings.
- Place skin-side down on a 375°F griddle surface and leave undisturbed for 7 minutes.
- The key technique: place a bacon press or cast iron weight on top to ensure complete skin contact with the griddle.
- Flip when skin is deeply golden and crisp, then cook another 7-8 minutes on meat side.
- Verify internal temperature reaches 175°F – thighs benefit from slightly higher temps than breasts.
- Rest 3-5 minutes before serving to complete the rendering process.
Whole Chicken Butterfly Technique
- Properly spatchcock your chicken by removing the backbone and flattening the bird.
- Season generously on both sides, paying special attention to the skin.
- Preheat Blackstone to 375°F and apply a thin layer of oil.
- Place chicken skin-side down and immediately apply pressure with a heavy cast iron press.
- Cook undisturbed for 10-12 minutes until skin browns beautifully.
- Flip carefully using large spatulas and tongs, then reduce heat to medium.
- Continue cooking 15-20 minutes until breast meat reaches 160°F and thighs reach 175°F.
- Rest for 10 minutes minimum before carving to retain maximum juiciness.
3 Mouthwatering Chicken on Blackstone Recipes
Classic Blackstone Grilled Chicken
| Ingredients | Amount |
| Boneless chicken breasts | 4 pieces (6-8 oz each) |
| Olive oil | 2 tablespoons |
| Garlic powder | 1 tablespoon |
| Paprika | 2 teaspoons |
| Salt | 1 teaspoon |
| Black pepper | 1 teaspoon |
| Fresh lemon | 1 whole |
| Fresh rosemary | 2 sprigs |
Begin by combining garlic powder, paprika, salt, and pepper in a small bowl. Drizzle chicken breasts with 1 tablespoon olive oil, then coat evenly with the seasoning mixture. Allow to rest at room temperature for 20 minutes.
Preheat your Blackstone to medium-high (approximately 375°F). Apply remaining oil to the griddle surface. Place chicken presentation-side down and cook undisturbed for 6 minutes. Flip once and continue cooking 5-7 minutes until internal temperature reaches 160°F.
During the final minute, squeeze half the lemon over the chicken and place rosemary sprigs nearby to infuse aromatic oils. Remove chicken and let rest 5 minutes before serving with remaining fresh lemon wedges.
Blackstone Chicken Fajitas
| Ingredients | Amount |
| Chicken thighs | 2 pounds, boneless, skinless |
| Bell peppers | 3 different colors, sliced |
| Onions | 2 large, sliced |
| Fajita seasoning | 3 tablespoons |
| Lime juice | 2 tablespoons |
| Flour tortillas | 12 small |
| Avocado | 2 ripe |
| Sour cream | 1 cup |
| Salsa | 1 cup |
Slice chicken thighs into 1/2-inch strips and toss with 2 tablespoons fajita seasoning and lime juice. Marinate for at least 30 minutes.
Preheat Blackstone to high heat (400-425°F). Create three cooking zones: high, medium-high, and medium.
Add chicken to the high heat zone, spreading pieces evenly without overcrowding. Allow to sear undisturbed for 2 minutes, then toss and continue cooking until nearly done (about 4 more minutes).
Simultaneously, add bell peppers and onions to the medium-high zone with a light drizzle of oil and remaining fajita seasoning. Cook, tossing occasionally, until vegetables develop slight char while maintaining some crispness.
Move everything to the medium zone, combine, and finish cooking together for 1-2 minutes. Move to the cooler side of the griddle while quickly warming tortillas on the hot zone (about 20 seconds per side).
Serve immediately with sliced avocado, sour cream, and your favorite salsa.
Blackstone Asian-Inspired Chicken Stir Fry
| Ingredients | Amount |
| Chicken breast | 1.5 pounds, cubed |
| Broccoli | 2 cups, florets |
| Carrots | 2 medium, julienned |
| Snow peas | 1 cup |
| Soy sauce | 1/4 cup |
| Sesame oil | 1 tablespoon |
| Ginger | 1 tablespoon, freshly grated |
| Garlic | 3 cloves, minced |
| Green onions | 4, chopped |
Combine soy sauce, 2 teaspoons sesame oil, ginger, and garlic in a bowl. Toss chicken cubes in this mixture and marinate for 30 minutes.
Preheat Blackstone to high heat (425°F). Apply remaining sesame oil to the griddle surface. Add chicken pieces in a single layer without crowding. Allow to sear undisturbed for 2 minutes before tossing. Continue cooking for 3-4 additional minutes until nearly done.
Push chicken to a cooler zone and add broccoli and carrots to the hot zone. Cook for 3 minutes, tossing occasionally. Stir in snow peas and simmer for another minute.
Combine all ingredients, add any remaining marinade, and toss together for 1-2 minutes until vegetables reach desired tenderness and chicken is completely cooked.
Garnish with chopped green onions before serving over rice or noodles.
Troubleshooting Common Chicken on Blackstone Problems
Preventing Chicken from Sticking
Sticky chicken frustrates many Blackstone beginners but is easily prevented. Start with a properly seasoned griddle – multiple layers of oil baked onto the surface create a natural non-stick barrier.
Choose oils with high smoke points like avocado, grapeseed, or refined coconut oil. Apply to both the griddle and the chicken itself.
Ensure your griddle reaches proper temperature before adding chicken. Cold surfaces grab onto proteins immediately. The sizzle upon contact indicates proper temperature – if you don’t hear it, wait longer before adding chicken.
Perhaps most importantly, resist the urge to move or flip the chicken prematurely. When properly seared, chicken naturally releases from the cooking surface. If it’s sticking, it likely needs more time undisturbed.
Avoiding Undercooked or Dry Chicken
The temperature tightrope represents every chef’s challenge with chicken. Your digital meat thermometer eliminates guesswork – insert it into the thickest part of the meat without touching bone.
Remember these target temperatures:
- Breasts: 160°F (carryover cooking will reach 165°F during rest)
- Thighs/Drums: 175°F (higher temp breaks down connective tissue)
- Ground chicken: 165°F immediately
Always rest your chicken after cooking. This isn’t optional – it’s essential for redistributing juices throughout the meat. Larger pieces require longer resting times.
Utilize your Blackstone’s zone cooking capability. Start chicken on high heat to develop crust, then move to medium to finish cooking without drying out the exterior.
Managing Flare-ups and Smoke
While traditional grills suffer from dangerous flare-ups, Blackstones typically generate smoke rather than flames when cooking chicken. Control this by using appropriate oil amounts – just enough to prevent sticking without pooling.
Keep your griddle clean between batches, using the scraper to remove any burnt bits that might smoke excessively. A squirt bottle of water (used cautiously and sparingly) can help tame particularly hot spots.
Manage drippings by maintaining the slight tilt of your griddle toward the grease trap. Ensure this trap is emptied regularly during extended cooking sessions.
Cleaning and Maintaining Your Blackstone After Cooking Chicken
Post-chicken cleaning requires prompt attention to prevent flavor transfer to future meals. While the griddle remains hot (but turned off), scrape all food particles toward the grease trap using your metal scraper.
For stubborn chicken residue, pour a small amount of water onto the hot surface and immediately scrape again – the steam helps release stuck-on bits without damaging your seasoning.
Once cleared of debris, apply a very thin layer of cooking oil to the entire surface using a paper towel held with tongs. This maintains the seasoning layer and prevents rust.
After frequent chicken cooking sessions, consider re-seasoning your griddle completely. This involves cleaning thoroughly, heating until smoking, applying multiple thin layers of oil, and allowing each to polymerize (smoke off) before adding the next.
Taking Your Blackstone Chicken to the Next Level
Advanced Flavoring Techniques
Elevate your Blackstone chicken with specialized flavor-enhancing methods. Try using a smoke tube filled with your favorite wood pellets placed at the corner of your griddle. This infuses light smoky flavor without the maintenance of a traditional smoker.
Create herb bundles (fresh rosemary, thyme, sage) tied with kitchen twine. Place these near your cooking chicken, occasionally pressing the meat directly onto the herbs to release aromatic oils.
Develop compound butters combining softened butter with herbs, spices, citrus zest, or even hot sauce. Apply a small pat to your chicken during the final minute of cooking or immediately after removing from heat.
Master the timing of sauce application – glazes containing sugar should only be applied during the final 1-2 minutes to prevent burning while still developing beautiful caramelization.
Blackstone Chicken Meal Prep Strategies
Your Blackstone’s spacious cooking area makes it ideal for batch cooking. Prepare multiple chicken meals simultaneously by designating different griddle sections for different recipes or marinades.
Store cooked Blackstone chicken properly by cooling completely before refrigerating in airtight containers. Most preparations remain at peak quality for 3-4 days refrigerated.
When reheating previously cooked Blackstone chicken, avoid microwaves which tend to toughen the meat. Instead, wrap loosely in foil and heat in a 300°F oven until just warmed through.
For longer storage, freeze individual portions wrapped in plastic then foil. Thaw in the refrigerator overnight before reheating for best texture preservation.
Conclusion
Mastering chicken on your Blackstone transforms ordinary meals into extraordinary culinary experiences. The unparalleled sear, remarkable juiciness, and flavor-enhancing capabilities of flat-top cooking elevate poultry dishes to restaurant quality with surprisingly minimal effort.
As you experiment with different cuts, marinades, and cooking techniques, you’ll develop your own signature Blackstone chicken dishes. Remember that practice leads to perfection – each session on your griddle builds skills and confidence.
Always prioritize food safety with chicken, but don’t let overcautiousness lead to overcooked results. Your trusty meat thermometer remains your most valuable tool in achieving that perfect balance.
Join the passionate community of Blackstone enthusiasts online to share your successes, learn from others, and continue expanding your outdoor cooking repertoire. Your journey with cooking chicken on Blackstone has just begun – and the delicious possibilities stretch endlessly before you.
FAQ About Cooking Chicken on Blackstone
What temperature should my Blackstone be for cooking chicken?
For optimal results when cooking chicken on Blackstone, preheat your griddle to 375-400°F for most cuts. This temperature range creates the perfect balance – hot enough to develop a flavorful sear while preventing the exterior from burning before the interior cooks through. Larger pieces like bone-in thighs or whole butterflied chickens benefit from a dual-zone approach: start at 400°F for initial searing, then reduce to 350°F to finish cooking through completely without drying out. Always verify safe internal temperatures with a meat thermometer – 165°F for all chicken parts.
How long should chicken be cooked on a Blackstone griddle?
Cooking times when preparing chicken on Blackstone vary by cut thickness and starting temperature. Boneless breasts typically require 5-7 minutes per side, while bone-in thighs need 7-9 minutes per side for proper doneness. Tenders cook quickly at just 3-4 minutes per side. Butterflied whole chickens take approximately 10-12 minutes skin-side down, followed by 15-20 minutes after flipping. These guidelines assume room-temperature meat – cold chicken direct from the refrigerator requires additional time. Rather than relying solely on timing, always verify doneness with a meat thermometer for both safety and optimal texture.
Can I cook frozen chicken directly on my Blackstone?
While technically possible, cooking frozen chicken directly on Blackstone isn’t recommended. The extreme temperature differential between frozen meat and the hot griddle causes uneven cooking – often resulting in dried-out exteriors before interiors reach safe temperatures. For best results, thaw chicken completely in the refrigerator (never at room temperature for extended periods). If you’re truly in a time crunch, use the “cold water method” – submerge sealed chicken in cold water, changing every 30 minutes, allowing approximately 30 minutes thawing time per pound before cooking on your Blackstone.
What oil is best for cooking chicken on Blackstone?
The ideal oils for cooking chicken on Blackstone have high smoke points to withstand griddle temperatures without burning. Avocado oil stands out as the premier choice with its impressive 520°F smoke point and neutral flavor. Other excellent options include refined (not virgin) coconut oil, safflower oil, and grapeseed oil. While many cooks reach for olive oil by habit, its relatively low smoke point makes it less suitable for high-temperature Blackstone cooking. Apply oil sparingly to both the griddle surface and the chicken itself – just enough to prevent sticking without causing excess smoke or flare-ups.
How do I know when my chicken is done on the Blackstone?
Determining doneness when cooking chicken on Blackstone requires a multi-sensory approach. First and foremost, use a digital instant-read thermometer inserted into the thickest part of the meat without touching bone. Chicken breasts should reach 160°F (they’ll continue rising to 165°F while resting), while thighs perform better at 175°F. Visual indicators include clear (not pink) juices when pierced and meat that’s opaque throughout. Properly cooked chicken also offers slight resistance when pressed – neither too firm (overcooked) nor too soft (undercooked). Never rely on color alone, as some chicken remains slightly pink even when fully cooked due to bone marrow or smoking processes.
Can I cook different parts of chicken together on the Blackstone?
The spacious surface of your Blackstone griddle makes cooking various chicken parts simultaneously entirely possible with smart planning. Utilize temperature zones by adjusting burners to different heat levels. Place thicker, bone-in cuts like thighs on hotter zones while positioning quicker-cooking pieces like breasts or tenders on medium zones. Stagger start times according to expected cooking duration – begin with pieces requiring longer cooking, adding faster-cooking cuts later. For whole meals, designate separate griddle areas for chicken and vegetables based on cooking requirements. This zone approach maximizes efficiency while ensuring each piece reaches perfect doneness without over or undercooking.
How do I prevent my chicken from drying out on the Blackstone griddle?
Maintaining moisture when cooking chicken on Blackstone begins with preparation techniques. Brining (soaking in saltwater solution) for at least 2 hours before cooking can increase moisture retention by up to 15%. Choose appropriate cuts – thighs naturally resist drying more than breasts due to higher fat content. Avoid the common mistake of repeatedly flipping chicken, which releases precious juices. Instead, flip only once when properly seared. Cook to the appropriate temperature without exceeding it – invest in a quality instant-read thermometer. Finally, implement the critical resting period after cooking, allowing juices to redistribute throughout the meat before cutting. For exceptionally juicy results, consider butterflying thicker pieces to create even thickness for more uniform cooking.


